FITMENT TECHNIQUES
Safeline’s customer service support team consists of a panel of technical experts who have years of experience working on the vehicle braking system.
- IMPORTANT NOTES FOR FITMENT
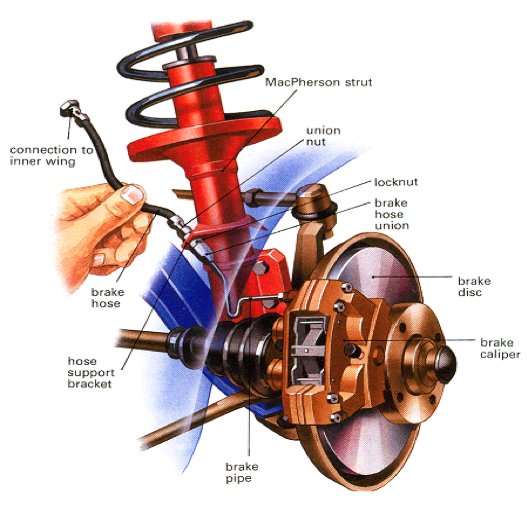
- HOW TO REPLACE BRAKE PADS - FIXED CALIPERS
- HOW TO REPLACE BRAKE PADS - SLIDING OR FLOATING CALIPERS
- HOW TO PUSH THE PISTONS BACK
- BLEEDING THE BRAKE SYSTEM
- BEDDING-IN BRAKE PADS
- Ensure vehicle is parked on level ground and supported by axle stands. DO NOT WORK ON A VEHICLE IF IT IS BEING SUPPORTED BY A LIFTING JACK!
- Before starting it is advised that a clean cloth or rag be placed over the brake fluid reservoir to absorb any excess brake fluid that may occur when the pistons are pushed back.
- Spilt brake fluid will damage vehicle paintwork. Wash away any spills with fresh water.
- Cleanliness is essential to ensure the proper performance of the pads. Ensure that calipers, pins, slides, discs, wheel hubs and all other related parts are free of dirt, rust, old grease, and oils before reassembly. Do not reuse pins, slides and shims. Replace with new.
- If working on a vehicle equipped with ABS, open the brake bleeding nipple before pushing the piston back into caliper. This can prevent contaminated brake fluid from entering the ABS module, which is costly to replace.
- When fitting rear pads, please note that certain vehicles require specialized tools to reset the handbrake or the piston within the caliper. If unsure, seek advice.
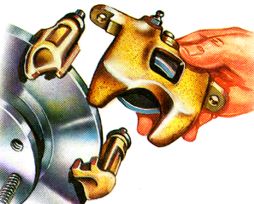
- Ensure vehicle is placed solidly on axle stands – remove wheels.
- Remove the anti-rattle spring clips.
- Push or tap-out the retaining pins. Pull out the old brake pads.
- Compare the old and new pads. Check for the correct part number.
- Carefully push the pistons back.
- Ensure calipers are free of dirt, brake dust and oils.
- Clean piston shims, if fitted, and refit to pad.
- Gently slide pads back into the caliper, noting correct inner/outer pad orientation.
- Refit retainer pins and new anti-rattle springs.
- Slowly pump the brake pedal a few times until pressure returns.
- If the pedal feels spongy, check for air in the hydraulic system.
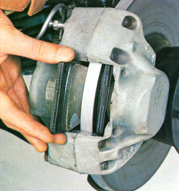
- Ensure vehicle is placed solidly on axle stands – remove wheels.
- Remove any old anti-rattle clips or pins, noting the orientation.
- Undo the bolts holding the caliper pins, NOT bolts holding caliper to suspension.
- Lift the caliper off its mountings. Do not allow the caliper to hang by the rubber brake hose.
- Remove the old pads and shims, if fitted.
- Clean the caliper of all dust and dirt.
- Inspect caliper pins. If dirty or sticky, clean thoroughly and apply a thin film of graphite grease, to allow caliper to slide freely over the pins.
- Carefully push the piston back into caliper.
- Clean shims, if fitted and refit to new pads.
- Refit new pads into caliper, noting correct inner/outer pad orientation. Ensure the pad can slide freely in the caliper without sticking.
- Remount caliper to bracket, ensuring new anti-rattle clips or springs are refitted.
- Slowly pump the brake pedal a few times until pressure returns.
- If the pedal feels spongy, check for air in the hydraulic system.
- Push the piston back by using a brake caliper piston retractor tool.
- If the brake fluid reservoir is full or the vehicle has ABS, loosen the nipple and collect the used brake fluid in a suitable container whilst pushing the pistons back.
- Ensure no air enters the hydraulic system during this process.
- Start the bleeding from the wheel furthest from the master cylinder.
- Use the brake bleed bottle to collect fluid to avoid spillage.
- It is recommended to enlist the help of someone to pump the brake pedal whilst bleeding the system.
The brake bedding-in procedure is a process of quickly heating and cooling the brakes in a repeated fashion, and while doing so it deposits a layer of pad material on the rotor surface. Temperature needs to be slowly heated to max use, which will create a smooth, even pad transfer. Bedding-in ensures the performance, safety, and longevity of the overall braking system.
WHAT DOES BEDDING-IN ENTAIL:
The transfer of a smooth, even layer of brake pad compound onto the rotor surface.
BEDDING-IN NEW BRAKE PADS:
The following procedure should be followed every time a new set of brake pads is fitted.
Apply 12 to 15 stops from 80/90km/hr down to 10 km/h if it is safe to do so, allowing 30 seconds between stops. Do not bring the vehicle to a complete stop between applications.
- The pedal travel should stabilise at approximately one-third of its total travel during these stops.
- Do not apply excessive pedal force or continue applications in order to achieve faster bedding.
- Heavy braking during bedding will result in glazing and overheating at the disc surface which may reduce braking performance.
- At constant maximum pedal force, the pedal travel must not change. If this cannot be achieved, recheck the entire braking system, as the risk of brake failure cannot be ruled out. Depending on the condition of your existing discs, bedding-in could take longer.
BENEFITS OF BEDDING-IN NEW BRAKE PADS:
Improve braking performance
Minimise brake squeal
Less vibration